Why Refactor?
We want to list a few reasons why refactoring is essential:
-
The first lines of code you write are usually not the best. You'll learn more about the problem you're solving as you go and find better ways to solve it.
-
Refactoring is the process of improving your code by writing it in a better way.
-
Refactoring is a way to improve the design of your code. It's a way to make your code more readable, maintainable, and extensible.
-
We always read more code than we write. So, writing code that's easy to read and understand is important.
Now, of course, the topic of refactoring is vast. There are entire books written about it. So, we just covered the bare minimum here. In our case, we'll focus on our code to make it more readable, maintainable, and extensible and make some performance improvements.
Let's see our current file that contains the entire code for the Todo App
import React from 'react';

type Priority = 'p1' | 'p2' | 'p3';

type Task = {
  id: number;
  title: string;
  isCompleted: boolean;
  priority?: Priority;
};

function App() {
  const [tasks, setTasks] = React.useState<Task[]>([]);

  const [taskName, setTaskName] = React.useState('');

  const onAddTask = () => {
    const trimmedTaskName = taskName.trim();

    if (!trimmedTaskName) {
      return;
    }

    setTasks([
      ...tasks,
      {
        id: new Date().getTime(), // Not a great way to generate IDs
        title: trimmedTaskName,
        isCompleted: false,
      },
    ]);

    setTaskName('');
  };

  const onInputKeyDown = (e: React.KeyboardEvent<HTMLInputElement>) => {
    if (e.key === 'Enter') {
      onAddTask();
    }
  };

  return (
    <div>
      <h1>Tasks</h1>
      <label htmlFor="task-input">Add Task: </label>
      <input
        id="task-input"
        value={taskName}
        onChange={(e) => setTaskName(e.target.value)}
        onKeyDown={onInputKeyDown}
      />
      <button onClick={onAddTask}>Add</button>
      <ul>
        {tasks.map((task) => (
          <li key={task.id}>{task.title}</li>
        ))}
      </ul>
    </div>
  );
}

export default App;
Honestly, this is not bad code, and it seems easy to read with around 62 lines of code. But we can still improve it. Here are a couple of things we find that can be improved:
-
The
Tasktype is defined inside theAppcomponent. This is not a good practice. We should move it outside the component. -
The input has a good amount of logic that can be extracted into a separate component.
Let's do these two things first. Of course, refactoring is a continuous process. So, we'll keep improving our code as we go.
Moving the Task type outside the App component
Move the Task type outside the App component. We'll create a new file called types.ts inside the src folder and move the Task type there. We'll also move the Priority type there as well.
type Priority = 'p1' | 'p2' | 'p3';

export type Task = {
  id: number;
  title: string;
  isCompleted: boolean;
  priority?: Priority;
};
Export the Task type from the types.ts file, and import it in the App component.
import React from 'react';
import { Task } from './types';

// Rest of the code omitted for brevity
Our main file is already 10 lines shorter. Let's move on to the next step.
Extracting the input into a separate component
Create a new TaskInput.tsx file inside the src folder. We'll move the input and the respective label into this file.
export default function TaskInput() {
  return (
    <>
      <label htmlFor="task-input">Add Task: </label>
      <input
        id="task-input"
        value={taskName}
        onChange={(e) => setTaskName(e.target.value)}
        onKeyDown={onInputKeyDown}
      />
    </>
  );
}
Of course, this won't work because we're using taskName, setTaskName, and onInputKeyDown inside the Input component. We'll pass these as props to the TaskInput component.
type TaskInputProps = {
  taskName: string;
  setTaskName: (taskName: string) => void;
  onInputKeyDown: (e: React.KeyboardEvent<HTMLInputElement>) => void;
};

export default function TaskInput({
  taskName,
  setTaskName,
  onInputKeyDown,
}: TaskInputProps) {
  return (
    <>
      <label htmlFor="task-input">Add Task: </label>
      <input
        id="task-input"
        value={taskName}
        onChange={(e) => setTaskName(e.target.value)}
        onKeyDown={onInputKeyDown}
      />
    </>
  );
}
Let's use the new TaskInput component in the App.
import React from 'react';
import { Task } from './types';
import TaskInput from './TaskInput';

function App() {
  // Some of the code omitted for brevity

  return (
    <div>
      <h1>Tasks</h1>
      <TaskInput
        taskName={taskName}
        setTaskName={setTaskName}
        onInputKeyDown={onInputKeyDown}
      />
      <button onClick={onAddTask}>Add</button>
      <ul>
        {tasks.map((task) => (
          <li key={task.id}>{task.title}</li>
        ))}
      </ul>
    </div>
  );
}

// Rest of the code omitted for brevity
Honestly, this is not a huge improvement at all. We just abstracted the label and input it into a separate component. Also, the number of lines has barely changed.
But let's have a good look at our components. Can we move the button to our new TaskInput component? Let's try that.
type TaskInputProps = {
  taskName: string;
  setTaskName: (taskName: string) => void;
  onInputKeyDown: (e: React.KeyboardEvent<HTMLInputElement>) => void;
  onAddTask: () => void;
};

export default function TaskInput({
  taskName,
  setTaskName,
  onInputKeyDown,
  onAddTask,
}: TaskInputProps) {
  return (
    <>
      <label htmlFor="task-input">Add Task: </label>
      <input
        id="task-input"
        value={taskName}
        onChange={(e) => setTaskName(e.target.value)}
        onKeyDown={onInputKeyDown}
      />
      <button onClick={onAddTask}>Add</button>
    </>
  );
}
We'll also pass the onAddTask function to the TaskInput component.
// Rest of the code omitted for brevity

function App() {
  // Some of the code omitted for brevity

  return (
    <div>
      <h1>Tasks</h1>
      <TaskInput
        taskName={taskName}
        setTaskName={setTaskName}
        onInputKeyDown={onInputKeyDown}
        onAddTask={onAddTask}
      />
      <ul>
        {tasks.map((task) => (
          <li key={task.id}>{task.title}</li>
        ))}
      </ul>
    </div>
  );
}

// Rest of the code omitted for brevity
We are getting there. Let's also think of a better name for the TaskInput component. We'll rename it to AddTask. Also, we'll rename to file to AddTask.tsx.
type AddTaskProps = {
  // Some of the code omitted for brevity
};

export default function AddTask({
  taskName,
  setTaskName,
  onInputKeyDown,
  onAddTask,
}: AddTaskProps) {
  // Some of the code omitted for brevity
}
Our App component must also be updated with the new name.
// Rest of the code omitted for brevity
import AddTask from './AddTask';

function App() {
  // Some of the code omitted for brevity

  return (
    <div>
      <h1>Tasks</h1>
      <AddTask
        taskName={taskName}
        setTaskName={setTaskName}
        onInputKeyDown={onInputKeyDown}
        onAddTask={onAddTask}
      />
      {/* Some of the code omitted for brevity */}
    </div>
  );
}

// Rest of the code omitted for brevity
Now, we can also move the onInputKeyDown function to the AddTask component as it just calls the onAddTask function. Also, let's update the props accordingly.
type AddTaskProps = {
  taskName: string;
  setTaskName: (taskName: string) => void;
  onAddTask: () => void;
};

export default function AddTask({
  taskName,
  setTaskName,
  onAddTask,
}: AddTaskProps) {
  const onInputKeyDown = (e: React.KeyboardEvent<HTMLInputElement>) => {
    if (e.key === 'Enter') {
      onAddTask();
    }
  };

  // Rest of the code omitted for brevity
}
We'll also update the App component accordingly.
import React from 'react';
import { Task } from './types';
import AddTask from './AddTask';

function App() {
  const [tasks, setTasks] = React.useState<Task[]>([]);

  const [taskName, setTaskName] = React.useState('');

  const onAddTask = () => {
    const trimmedTaskName = taskName.trim();

    if (!trimmedTaskName) {
      return;
    }

    setTasks([
      ...tasks,
      {
        id: new Date().getTime(), // Not a great way to generate IDs
        title: trimmedTaskName,
        isCompleted: false,
      },
    ]);

    setTaskName('');
  };

  return (
    <div>
      <h1>Tasks</h1>
      <AddTask
        taskName={taskName}
        setTaskName={setTaskName}
        onAddTask={onAddTask}
      />
      <ul>
        {tasks.map((task) => (
          <li key={task.id}>{task.title}</li>
        ))}
      </ul>
    </div>
  );
}

export default App;
Now we can see some reduction in the number of lines. Now, there is one more refactoring we can do that would improve our app's performance.
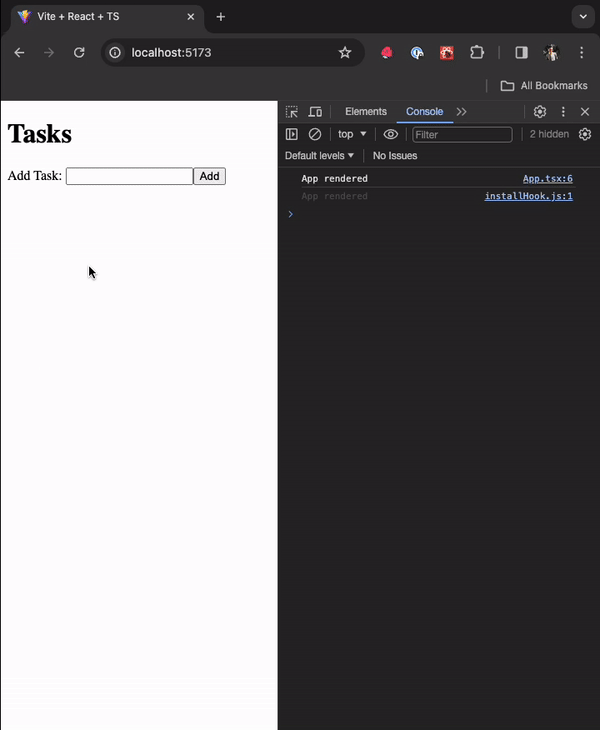
Let's see the performance problem in our app
Put up a console.log inside the App component and see how many times it's being called when we type something in the input.
// Rest of the code omitted for brevity

function App() {
  console.log('App rendered');

  // Rest of the code omitted for brevity
}

// Rest of the code omitted for brevity
Why is the App component being rendered so many times?
It all has to do with where our state is located. Our app has two states: tasks and taskName. The respective state is updated at different places in our app. The tasks state is updated inside the onAddTask function, and the taskName state is updated inside the setTaskName function.
// Rest of the code omitted for brevity

function App() {
  console.log('App rendered');

  const [tasks, setTasks] = React.useState<Task[]>([]);

  const [taskName, setTaskName] = React.useState('');

  const onAddTask = () => {
    const trimmedTaskName = taskName.trim();

    if (!trimmedTaskName) {
      return;
    }

    setTasks([
      ...tasks,
      {
        id: new Date().getTime(), // Not a great way to generate IDs
        title: trimmedTaskName,
        isCompleted: false,
      },
    ]);

    setTaskName('');
  };

  return (
    <div>
      <h1>Tasks</h1>
      <AddTask
        taskName={taskName}
        setTaskName={setTaskName}
        onAddTask={onAddTask}
      />
      <ul>
        {tasks.map((task) => (
          <li key={task.id}>{task.title}</li>
        ))}
      </ul>
    </div>
  );
}

// Rest of the code omitted for brevity
We could argue that the App component should be rendered when the tasks state is updated but not when the taskName state is updated. And we're right. But React doesn't know that. React will re-render the App component whenever any state inside the App is updated. And that's why the App component is being rendered so many times.
But we know the taskName state is only used inside the AddTask component. So, we can move the taskName state inside the AddTask component. Let's do that.
import React from 'react';

type AddTaskProps = {
  onAddTask: (taskName: string) => void;
};

export default function AddTask({ onAddTask }: AddTaskProps) {
  const [taskName, setTaskName] = React.useState('');

  const onInputKeyDown = (e: React.KeyboardEvent<HTMLInputElement>) => {
    if (e.key === 'Enter') {
      onAddTask(taskName);
    }
  };

  return (
    <>
      <label htmlFor="task-input">Add Task: </label>
      <input
        id="task-input"
        value={taskName}
        onChange={(e) => setTaskName(e.target.value)}
        onKeyDown={onInputKeyDown}
      />
      <button onClick={() => onAddTask(taskName)}>Add</button>
    </>
  );
}
We had to update our types as the App component now needs to know what task the AddTask component sends.
Let us also clean the App component.
import React from 'react';
import { Task } from './types';
import AddTask from './AddTask';

function App() {
  console.log('App rendered');

  const [tasks, setTasks] = React.useState<Task[]>([]);

  const onAddTask = (taskName: string) => {
    const trimmedTaskName = taskName.trim();

    if (!trimmedTaskName) {
      return;
    }

    setTasks([
      ...tasks,
      {
        id: new Date().getTime(), // Not a great way to generate IDs
        title: trimmedTaskName,
        isCompleted: false,
      },
    ]);
  };

  return (
    <div>
      <h1>Tasks</h1>
      <AddTask onAddTask={onAddTask} /> // [!code highlight]
      <ul>
        {tasks.map((task) => (
          <li key={task.id}>{task.title}</li>
        ))}
      </ul>
    </div>
  );
}

export default App;
Try typing something in the input now. You'll see that the App component is not being rendered anymore unless a new task is added, which is expected.
Oops, We seem to have broken something
If you try to add a new task now, you'll see that the input is not being cleared. The taskName state is now inside the AddTask component. So, we need to clear the input inside the AddTask component.
Though we saw this issue visually, we could have also caught it by running our existing tests. Some of our functionality might not always caught visually. So, it's always a good idea to run our tests after refactoring (in fact, have it running while refactoring too).
Let's run our tests.
npm test
We can see that the Input Clear Test is failing. Let's fix it.
import React from 'react';

type AddTaskProps = {
  onAddTask: (taskName: string) => void;
};

export default function AddTask({ onAddTask }: AddTaskProps) {
  const [taskName, setTaskName] = React.useState('');

  const handleAddTask = () => {
    const trimmedTaskName = taskName.trim();

    if (!trimmedTaskName) {
      return;
    }

    onAddTask(trimmedTaskName);
    setTaskName('');
  };

  const onInputKeyDown = (e: React.KeyboardEvent<HTMLInputElement>) => {
    if (e.key === 'Enter') {
      handleAddTask();
    }
  };

  return (
    <>
      <label htmlFor="task-input">Add Task: </label>
      <input
        id="task-input"
        value={taskName}
        onChange={(e) => setTaskName(e.target.value)}
        onKeyDown={onInputKeyDown}
      />
      <button onClick={handleAddTask}>Add</button>
    </>
  );
}
We are proxying the onAddTask function inside the handleAddTask function. This enables us to add more logic to the handleAddTask function, clearing the input and passing the trimmed task to the parent without affecting the onAddTask function. This also cleans up the App component.
import React from 'react';
import { Task } from './types';
import AddTask from './AddTask';

function App() {
  const [tasks, setTasks] = React.useState<Task[]>([]);

  const onAddTask = (taskName: string) => {
    setTasks([
      ...tasks,
      {
        id: new Date().getTime(), // Not a great way to generate IDs
        title: taskName,
        isCompleted: false,
      },
    ]);
  };

  return (
    <div>
      <h1>Tasks</h1>
      <AddTask onAddTask={onAddTask} />
      <ul>
        {tasks.map((task) => (
          <li key={task.id}>{task.title}</li>
        ))}
      </ul>
    </div>
  );
}

export default App;
Our tests are passing now, and we have a much cleaner code.
Using the Form to contain the input and button
A few folks in one of our webinars pointed out that we could have used a form to contain the input and the button. This is a good idea. As it will help eliminate the need for the onInputKeyDown function. Let's do that.
Let's do that now.
// Rest of the code omitted for brevity

export default function AddTask({ onAddTask }: AddTaskProps) {
  const [taskName, setTaskName] = React.useState('');

  const handleAddTask = () => {
    const trimmedTaskName = taskName.trim();

    if (!trimmedTaskName) {
      return;
    }

    onAddTask(trimmedTaskName);
    setTaskName('');
  };

  return (
    <form>
      <label htmlFor="task-input">Add Task: </label>
      <input
        id="task-input"
        value={taskName}
        onChange={(e) => setTaskName(e.target.value)}
      />
      <button onClick={handleAddTask}>Add</button>
    </form>
  );
}
We removed the onInputKeyDown function and the onKeyDown event listener from the input. We also wrapped the label, input, and button inside a form element. Our tests will still pass, but this approach has an issue. The form will be submitted when the button is clicked, and the browser will refresh. We don't want that. We want to prevent the form from submitting. We can add an onSubmit event listener to the form and stop the default event.
// Rest of the code omitted for brevity

export default function AddTask({ onAddTask }: AddTaskProps) {
  const [taskName, setTaskName] = React.useState('');

  const handleAddTask = (e: React.FormEvent<HTMLFormElement>) => {
    e.preventDefault();
    const trimmedTaskName = taskName.trim();

    if (!trimmedTaskName) {
      return;
    }

    onAddTask(trimmedTaskName);
    setTaskName('');
  };

  return (
    <form onSubmit={handleAddTask}>
      <label htmlFor="task-input">Add Task: </label>
      <input
        required
        id="task-input"
        value={taskName}
        onChange={(e) => setTaskName(e.target.value)}
      />
      <button>Add</button>
    </form>
  );
}
We added an onSubmit event listener to the form. We also added the required attribute to the input. This will prevent the form from submitting if the input is empty. We also updated the handleAddTask function to accept the e argument of type React.FormEvent<HTMLFormElement>. We also called the preventDefault method on the e argument to prevent the form from submitting.
We saw how good tests can help us maintain good code quality. We also saw how to improve our app's performance by moving the state to the right place.
This was a straightforward example of refactoring. But we hope you have an idea of how to refactor your code.
This is the end of this section. In the next section, we'll discuss component composition.
At this point, your code should be a good match to the branch of the repository: 7-refactoring